Showing posts with label TWD. Show all posts

Tuesday, April 15, 2014

TWD: Cantuccini with Dark Chocolate and Coconut


When Paul and I were first married, we lived in a two bedroom town home that shared a wall, a porch and a walkway with our neighbors, an elderly couple and their yappy Yorkie. Money was very tight and although we liked the idea of subscribing to the daily paper we chose to forgo doing so in order to save a couple of extra dollars each week. However, one Sunday after returning home from the early Mass, we were delighted to see a big, fat newspaper stuffed with ads sitting on our front porch. The news-people must have dropped us a free paper in an attempt to entice us to subscribe! We snatched up the paper and headed inside to enjoy a breakfast of scrambled eggs and hot coffee while leisurely looking over the news articles and perusing the shopping ads. We enjoyed it so much that we actually considered subscribing just to the Sunday paper, but our practical sides won out and we resisted temptation. However, the next week we were happy to find a Sunday paper sitting on our stoop once again. We did not question it and took it inside to enjoy once more. The following week, the paper showed up again. By then, we thought that perhaps our "free trial" was supposed to last a whole month and resolved to simply enjoy the paper for as long as it continued to come to us. 


Later that same week, I was outside collecting the mail when our neighbor walked outside and began to chat with me. We briefly discussed a story that had been in the news recently when my neighbor offhandedly mentioned: "Speaking of the news, I have had the hardest time getting the paper boy to deliver our Sunday paper. It's been missing the past few weeks."

Oops.

Remember how I said that we shared a front porch with our neighbors? Apparently the newspaper boy dropped the Sunday paper off a little closer to our door than their door and we erroneously thought it was for us. We had been stealing the neighbors' paper for weeks! I'm pretty sure they already disliked us, so this would certainly kill any chance of us being invited over for a dinner party.

We just quietly stopped stealing their paper and went back to enjoying our Sunday mornings without it. How does this story relate to this week's Tuesdays with Dorie challenge? Not really at all, but for some reason in the process of making these delightful cookies, this memory popped into my head. Maybe it was the fact that these cantuccini, a classical recipe Tuscan recipe for the more ubiquitous biscotti, pair so perfectly with a hot mug of coffee - just like a Sunday morning paper. Unlike biscotti, the cantuccini do not incorporate butter or oil into the batter, using only the fat found in the eggs to flavor and enhance the dough. They bake up extra-crispy and crunchy - the perfect texture for dunking.


I omitted the almonds called for in the original recipe and instead added 3/4 cup chopped bittersweet chocolate and 1 cup shredded coconut to make a flavor reminiscent of an almond joy. Thankfully, these come together very quickly and easily. I made them while barely awake at 6:15 AM on a Saturday morning because the children refused to let me sleep in at all. I got them back later in the day by putting them to bed a whopping two hours early.

Emma found them to be the perfect teething cookie. Paul thought these were great with coffee or chai. Matthew just likes any excuse to eat cookies for breakfast. Either way, this is a great recipe!


Cantuccini with Dark Chocolate and Coconut
adapted from Baking with Julia

2 cups flour
1 cup sugar
2 teaspoons baking powder
1/2 teaspoon cinnamon
1/4 teaspoon salt
1 cup sweetened shredded coconut
3/4 cup finely chopped bittersweet chocolate
3 large eggs
1 tablespoon vanilla extract

Preheat the oven to 350 degrees.

Whisk together the flour, sugar, baking powder, cinnamon, and salt. Toss with the coconut and chocolate. In a separate bowl, beat together the eggs and vanilla. Add to the flour mixture, stirring with a wooden spoon until a dough comes together. Turn out the dough onto a floured surface and knead together into a ball. Divide the dough in half and shape each half into a 12-inch long log. Transfer the logs to a parchment-lined baking sheet.

Bake in the preheated oven for 30 minutes, or until brown and firm. Remove from the oven and transfer the logs from the baking sheet to a wire rack to cool completely. Leave the oven on.

Once cool, cut cross-wise into 1/4-inch thick slices. Using the same baking sheet as before, lay the cantuccini cut side down on the baking sheet and return to the oven for about 10-15 additional minutes, or until browned and firm. Enjoy with coffee or tea!

Tuesday, March 4, 2014

TWD: Buttermilk Scones with Orange Glaze


Panera is one of my favorite places to take the kids for an afternoon treat. Both of my kids love bread of any kind (as does their mama!) and Panera also has fresh coffee with refills. The kids munch on bagels, baguettes, or a pastry while I gulp down as much as coffee as I can. And I wonder why I get the shakes so much.

Anyway, one of my favorite treats at Panera are the orange scones. They are not too sweet and have a texture and flavor reminiscent of a fluffy buttermilk biscuit. The scone boasts flecks of freshly grated orange zest baked into the batter and is smothered in a magnificent orange glaze of which I would gladly eat a whole bowlful. A divine snack, indeed.


When I saw that the recipe for this week's Tuesdays with Dorie challenge was for buttermilk scones, I decided to try to pay homage to my favorite Panera treat by glamming these up a bit. I added some extra orange zest, a touch more sugar, and topped the baked scones with a delicious orange glaze while they were still slightly warm so that it was sure to melt into the surface of the scone. Delicious!

Like most scone recipes, this one came together quickly and had everyone eagerly awaiting their arrival to the breakfast table. The recipe indicated two different shaping methods for the scones - a more traditional wedge-shape and a "rolled scone". The rolled scones were rolled up and cut in a manner similar to cinnamon rolls. I had never heard of that particular shape for scones - so I gave it a whirl with half the dough. We served them slightly warm alongside a strawberry smoothie and they made a wonderful weekend breakfast. I am so glad that I amped the orange flavor up a bit - the flavor was incredible! They are just as delicious as the Panera scones - and I can make a dozen for about the same price a single scone would cost me at Panera. Paul thought the rolled scones tasted more delicious than the wedges because the glaze sunk into the folds, meaning more gooey glaze in every bite. His exact quote was: "Shape all your scones like this!" We'll see.


My culinary assistant for the day was so excited to help. She happily guarded the stand mixer (I was working on another bread recipe at the same time) while I whipped up the scone dough by hand. I think she's going to be a future little baker, just like her brother!


Buttermilk Scones with Orange Glaze
adapted from Baking with Julia

For the Scones:     
3 cups all-purpose flour
1/3 cup sugar
2 1/2 teaspoons baking powder
1/2 teaspoon baking soda
3/4 teaspoon salt
6 ounces unsalted butter, cut into small pieces
1 cup buttermilk
1 tablespoon grated orange zest (from about 2 medium oranges)

For the Topping:
2 ounces melted butter, for brushing
1/4 cup sugar (add a little orange zest for additional orange flavor)

For the Glaze:
3 tablespoons unsalted butter, melted
1 cup powdered sugar, sifted
1/2 teaspoon pure vanilla extract
2 tablespoons freshly squeezed orange juice
Pinch of salt

To Make the Scones:
Position racks to divide oven into thirds and preheat to 425°F.  Stir flour, sugar, baking powder, baking soda, and salt together with a fork.  Add butter pieces and work it into the dry ingredients until mixture resembles coarse cornmeal.  Pour in 1 cup buttermilk and the zest, and mix until ingredients are just moistened.  If dough looks dry, add another tablespoon buttermilk.  Gather dough into a ball, turn it onto a lightly floured work surface, and knead briefly.  Cut dough in half.

To Make Triangular-Shaped Scones:
Roll one piece of dough into a 1/2-inch-thick circle that is 7 inches across.  Brush the dough with half of the melted butter, sprinkle with 2 tablespoons of sugar, and cut the circle into 6 triangles.  Place the scones on an ungreased baking sheet and repeat with remaining dough.

To Make Rolled Scones:
Roll one piece of dough into a 12 inch long and 1/2 inch thick strip.  Spread with half of the melted butter and dust with 2 tablespoons of sugar.  Roll the strip up from a long side like a jelly roll; pinch seam closed and turn seam side down.  Cut the roll in half and cut each piece into six 1-inch-wide roll-ups.  Place cut side down on an ungreased baking sheet, leaving a little space between each.

Bake scones 10 minutes or until both tops and bottoms are golden.  Transfer to a rack to cool.

To Make the Glaze:
While the scones are cooling, whisk together all the ingredients for the glaze in a medium bowl. Once the scones are only slightly warm, top with the 1 tablespoon of the glaze, spreading with a small spoon so the glaze spreads all over the surface of the scone. Serve!

Tuesday, December 3, 2013

TWD: Challah


Challah! It's what we've all been baking up for this week's edition of Tuesdays with Dorie. I have gone on and on many a time about my love for Challah and how it is my favorite yeast bread in the whole wide world. I have a favorite recipe that I make over and over, but I am always up for trying a new recipe for it. Plus, it's a bread that the whole family looks forward to eating. This was baking in the oven when Paul came home from work and breathed in the unmistakable aroma of freshly baked bread. He immediately galloped into the kitchen and excitedly asked: "Are you making challah?"

Then he got out the butter (his favorite condiment) to soften. See? Everyone in this household enjoys a slice (or five) of challah!

My standard challah recipe calls for oil instead of butter and a touch more sugar. It's soft, sweet, and pretty much challah perfection in my opinion. However, I thought this recipe came pretty close to matching it in taste and texture. Overall, I thought this version was a bit more time consuming than my standard challah, the hardest part being all the waiting time between rises - it seemed like forever until we could pull a fresh loaf out of the oven. The texture of this bread is soft and almost pillowy, the taste is buttery and slightly sweet, and it was the perfect accompaniment to our dinner of Thanksgiving leftovers (I think we're only about halfway through our leftover stuffing, turkey, and mashed potatoes...did we make too much this year?).

This is an excellent recipe. I urge you to give it a try and perhaps give a loaf or two away as Christmas gifts along with a jar of homemade preserves if you're super into fancy DIY gifts (it would definitely be a jar of Smucker's in my case).


Challah
adapted from Baking with Julia

For the dough:
1 1/2 tablespoons active dry yeast
1/2 cup tepid water (80-90 degrees)
1/3 cup sugar
1 stick (4 ounces) unsalted butter, at room temperature
1 cup whole milk
1 tablespoon honey
2 1/2 teaspoons salt
4 large eggs
6 1/2 cups (approximately) bread flour

For the egg glaze:
1 large egg
1 large egg yolk
1 tablespoon milk or cream

Whisk the yeast into the tepid water. Add a pinch of sugar and let rest for about 5 minutes or until the yeast dissolves and blooms.

Meanwhile, cut the butter into small pieces and place in a saucepan with the milk. Heat until the milk is very warm and the butter is melted. Pour into the bowl of a stand mixer and add the 1/3 cup sugar, honey, and salt. Stir to dissolve the sugar and salt. Take the temperature of the mixture and make sure that it is no higher than 110 degrees before proceeding with the recipe. If necessary, let it cool.

Add the creamy yeast to the milk mixture along with the eggs. Stir with a whisk to combine. Add about 5 cups of flour and, using the paddle attachment, beat with the stand mixer on low speed until very well combined. Add flour, bit by bit, until the dough begins to gather around the paddle. At this point, switch to the dough hook and gradually add additional flour as needed to make a soft dough that cleans the sides of the bowl. Knead on medium-low for 8-10 minutes or until soft, smooth, and elastic.

Coat a large bowl with a little bit of oil. Form the dough into a ball and transfer it to the bowl. Turn once to coat, cover with plastic wrap, and let rise until doubled, about 60-90 minutes. When the dough has fully risen, deflate with your fist, cover as before, and let it rise until it doubles again, about 45 minutes.

Line two baking sheets with parchment or silicone baking mats. Deflate the dough and turn it onto a lightly floured work surface. Divide the dough into two portions and return one portion back to the bowl and cover. Cut the other portion of dough into three equal pieces. Using your hands, form each piece into a 16-inch long rope. Braid the three ropes together, tucking the ends under. Transfer the braided loaf to one of the prepared baking sheets and cover with a slightly damp towel. Repeat with the second portion of dough.

Let the loaves rise at room temperature for 40 minutes or until soft, puffy, and doubled.

Position the racks to divide the oven into thirds and preheat to 375 degrees.

To make an egg glaze, whisk together the egg, yolk, and 1 tablespoon of milk or cream. Brush the tops and sides of the challah loaves with the glaze. Let the glaze set for 5 minutes, and then brush again. Reserve the remaining glaze for brushing the loaves during baking.

Bake the loaves in the preheated oven for 20 minutes. The loaves will expand and expose some of the inner dough. Brush the newly exposed dough with the reserved glaze and continue to bake for 15-20 minutes longer, or until an instant read thermometer inserted into the thickets part of the braid registers 210 degrees.

Transfer the loaves to a wire rack and let cool completely before slicing.

Tuesday, August 20, 2013

TWD: Johnnycake Cobbler with Pluots


This week's Tuesdays with Dorie recipe has been one of my absolute favorite recipes the group has baked so far. I have always loved the combination of cornmeal and fruit (as evidenced by one of my favorite desserts being Blueberry Cornbread). When I saw the recipe for a cobbler that employed a hefty dose of cornmeal in the biscuit topping, I immediately voted for this recipe to made by the group as soon as possible.

The same week I was supposed to be baking the cobbler, our local store began selling a beautiful variety of pluots - plum/apricot hybrids of all different colors. Yellow, pink, black, red, speckled, and streaked - pluots are sometimes called "dinosaur eggs" due to their appearance and each variety has its own unique sweet flavor. They were perfect for use in this cobbler!


Everything was thrown together in a matter of minutes. First, the fruit is sauteed in butter and sugar to help release and reduce the fruit juices. While the fruit cooks down, a simple biscuit batter is formed. The recipe called for the use of a food processor, but I just used my hands. I chose to omit the ginger from the biscuit simply because I really do not think ginger and cornmeal mix well. I also did not use *all* the heavy cream called for in the recipe as I only had 1/2 cup left in my fridge and really did not feel like going to the store for more. I ended up using 1 cup of buttermilk to make up for the additional liquid.


The biscuit topping is carefully spooned on top of the warm fruit and then everything is baked until the topping is golden brown and the fruit juices are bubbling away. The whole house smelled heavenly.

I removed the cobbler from the oven, snapped a few photos, and then Paul and I brandished our spoons and began to dig in. This proved to be a huge mistake as we both have been unable to taste anything for the past few days since we burnt our faces off. However, that piping hot bite of glorious cobbler was totally worth it. This recipe is a keeper. The biscuit on top is crisp and contrasts perfectly with the soft fruit, while the dough that touched the fruit during the baking process had the texture of a steamed dumpling. It was pretty delicious! I loved the pluots in this but can't wait to try the same recipe with all the fresh peaches flying off the trees around here!

Check out the Tuesdays with Dorie website to see how the other bakers fared with this week's challenge!


Johnnycake Cobbler with Pluots
adapted from Baking with Julia

For the Fruit:
3 tablespoons unsalted butter
1/4 cup sugar
6 cups sliced pluots

For the Biscuit Topping:
1 1/2 cups all-purpose flour
1/2 cup cornmeal
3 tablespoons sugar
1 tablespoon baking powder
1/2 teaspoon baking soda
1 teaspoon salt
1/2 stick (2 ounces) unsalted butter, cut into small pieces
1/2 cup heavy cream
3/4-1 cup buttermilk

Melt the butter in a large skillet over medium heat. Add the sugar, stirring to dissolve, then toss in the fruit. Cook, stirring occasionally, until the fruit is soft and releases its juices. Increase the heat to high and cook for a few minutes more to boil down the juices, stirring occasionally. Spoon the fruit into a 1 1/2 quart baking pan and set aside while you make the topping.

Preheat the oven to 425 degrees with a rack in the center position.

Whisk together the four, cornmeal, sugar, baking powder, baking soda, and salt. Using your fingers, gently rub in the pieces of butter until the mixture feels like coarse meal. Make a well in the center and add in the heavy cream and 3/4 cup buttermilk. Using a fork, mix everything together, drawing the dry ingredients in from the sides, until a dough forms. If the mixture appears too dry, add in up to 1/4 cup additional buttermilk. The dough should be soft, moist, and form curds as you stir it.

Spoon the biscuit dough over the fruit. Place the cobbler on a foil-lined baking sheet and bake for 14-16 minutes, or until the biscuit is golden brown and the fruit juices are bubbling. Serve with ice cream or additional heavy cream!

Tuesday, July 16, 2013

TWD: Summer Vegetable Tart


This is definitely not the prettiest dish I have ever made. But boy was it tasty!

If you can get past the fact the unappetizing, brownish appearance and just trust me when I say that this tart was a fantastic addition to our Sunday brunch menu. Paul gobbled up a huge portion of it and once again declared it a "keeper." We have been saying that about a lot of the recipes from Baking with Julia, I know...but the hits just keep on coming! I loved how easy this was to prepare - I had this on the table within 20 minutes of pulling the phyllo dough out of the fridge (although I was very sloppy when arranging the phyllo in the pie pan because I was trying to get the thing on the table quickly).

As there were no red bell peppers at our Farmer's Market, I chose to use yellow instead. I also went with my favorite creamy feta cheese instead of goat cheese simply because Paul has a major problem with goat cheese. He first tried it on our honeymoon when we stopped at this little cafe for lunch. One of the sandwiches on the menu caught his eye simply because it had arugula listed as one of the components. Being a huge fan of arugula, Paul promptly folded his menu back up and ordered the sandwich. There are so many things are wrong with this scenario.

1) Who orders a sandwich based just on the type of lettuce included?

2) When his order arrived, Paul balked at the fact that it was in fact a vegetarian entree, something that would not have been such a surprise had he read the menu description a little more closely.

3) The sandwich was piled high with chevre, which was meant to be the true highlight of the sandwich, and Paul had always voiced a distaste for goat milk. He took one bite of that sandwich and no amount of peppery arugula could cover up the gamy taste of the goat cheese. The cheese the chef had chosen was particularly pungent - taking a bite of it made you feel as if the goat was sitting at the table enjoying lunch with us. Very, very strong. We actually had to ask the server to remove the offending sandwich so we could continue to breathing without inhaling the smell from the cheese. Paul still shudders when thinking about it.

So, in order to avoid bringing up memories of that disastrous lunch, feta was used in my tart.


There is not much more to say about this tart except that it was absolutely delicious! I did not think the phyllo added a lot to the actual tart, but I appreciated it being there in lieu of a heavier pie or tart crust. We will definitely be making this again with a different variety of vegetables - I could see some sauteed zucchini and summer squash working marvelously! Head on over to the Tuesdays with Dorie site to see how the other members fared!

Tuesday, July 2, 2013

TWD: Baked Yogurt Tart with Blueberries and Almonds


We're back with another delicious recipe from Baking with Julia! This week, my fellow bakers and I tackled a pretty simple recipe for a Baked Yogurt Tart. This recipe was really, really easy for me because I happened to have a couple disks of pie dough frozen and ready to use!


First, the crust is par-baked in a 9" cake pan. I ended up just using my deep dish pie pan because it's so pretty and I never use it all that often. I knew that my pie pan would make the tart a bit deeper than the recipe intended and thus extend the baking time, but I chose to go with it anyway. After the baked crust is cool, it is filled with a mixture of yogurt, eggs, sugar, vanilla, and flour. Top with the berries, fruit, and a sprinkling of toasted nuts and the tart is ready to bake!


I chose to top my tart with sliced peaches (my husband's favorite fruit) and fresh blueberries (MY favorite!). The recipe indicates that the tart should bake for 35-40 minutes or until "browned on top." Mine baked for a good 50 minutes before it finally set up. Unfortunately, the peaches leached a lot of juice into tart, creating a nice little puddle in the center. I'm a big fan of peach juice, but really thought the tiny swimming pool in the center of my dessert was a little unappetizing. I just dabbed off the extra juice with a couple of paper towels once the whole thing was pulled out of the oven - no harm done!


We waited until this cooled to room temperature before trying a piece. Full of yogurt flavor mingled with the sweet fruit juices - this was a refreshing summer dessert that could almost be an appropriate brunch item! I really enjoyed both the creamy texture of the filling and the fact that this was really not very sweet at all. The remainder of the tart is currently chilling in our refrigerator because we want to see how it tastes cold. I honestly thought the only part that was a bit of place was the pie crust. While it tastes delicious, I thought a graham cracker or oatmeal crust would have been a more appropriate pairing with the filling. That could just be my intense love for the granola/yogurt combination coming through!

Check out the Tuesdays with Dorie website to see how the other bakers fared with this tart! You can make this tart for yourself by picking up a copy of Baking with Julia. I have also posted my lightly adapted version of the recipe below.

Baked Yogurt Tart
adapted from Baking with Julia

For the tart:
1 recipe of pie dough or flaky tart dough, well chilled
3/4 cup sugar
3 eggs
2 tablespoons vanilla
2 cups plain, nonfat yogurt
3/4 cup flour

For the topping:
1/3 cup blanched slivered almonds, toasted
1 1/2 - 2 cups sliced peaches and blueberries (or other fruit of choice!)

To parbake the crust: Roll the dough out and fit into a 9-inch deep dish pie pan. Alternatively, you can use a 9-inch pie pan or springform pan. Flute the edges and chill the pie crust in the refrigerator for at least 30 minutes. Meanwhile, preheat the oven to 400 degrees.

Fit a square of parchment or foil in the center of the pie crust and fill with pie weights, rice, or dried beans. Bake for 20-25 minutes or until the crust is lightly browned. Let cool completely to room temperature on a wire rack.

Reduce the oven to 325 degrees. In the bowl of a stand mixer, beat the sugar and eggs together on medium speed for 3-4 minutes, or until well-mixed and pale yellow in color. Add the yogurt and vanilla and gently stir everything together with a spatula to mix well. Gradually sift the flour into the mixture, folding everything together with a spatula. Pour the yogurt mixture into the prepared crust and top with the fruit of choice, arranging the fruit in a pretty pattern all over the top of the filling. Gently sprinkle the toasted almonds along the circumference of the filling.

Bake for 35-50 minutes or until the filling is set. Let cool to room temperature. Serve at room temperature or chilled.


Tuesday, June 18, 2013

TWD: Cheese and Tomato Galette


One of the best things about summer is the abundance of beautifully ripe and deliciously fragrant tomatoes. Although I could not stand them as a child, tomatoes have become one of my favorite mealtime staples. Unfortunately, during the winter tomatoes are pretty boring, tasteless, and expensive. Come January, I am dreaming of caprese salads, pizza margherita, tomato pies, and hummus sandwiches piled high with tomatoes. I was delighted when this recipe for cheese and tomato galette was chosen for the next Tuesdays with Dorie challenge because it is a perfectly elegant way to celebrate tomatoes and the beginning of summer.

The dough could not have been easier to throw together. While Matthew munched on a peanut butter sandwich and Emma entertained herself on her playmat, I quickly threw all the ingredients into a food processor, gave them a little whirl, and then formed the resulting dough into a disk. After chilling in the fridge for at least two hours, the dough rolled out easily. A mixture of Monterey Jack, Mozzarella, and sliced basil are tossed together and sprinkled over the dough and then topped with sliced tomatoes. I added a healthy sprinkling of salt and pepper on top of the tomatoes before sliding the galette into the oven to bake for a scant 35 minutes.

Unfortunately, we were not able to enjoy the galette as soon as it emerged from the oven because we had to rush off to watch Paul play in an epic softball game. I snapped a couple quick photos and then left the galette on the counter to cool. When we returned, I was surprised that the excess liquid from the tomatoes had not caused the crust to turn soggy. Rather, it was still firm, buttery, and very flaky. Paul enjoyed a slice of the galette immediately and declared the recipe a keeper. Given my love for tomatoes, this will definitely be a recipe that I will make again.

If you would like to make this galette, please pick up a copy of Baking with Julia. Check out the Tuesdays with Dorie website to see how the other bakers fared!

Tuesday, April 2, 2013

TWD: Rustic Potato Loaves


This week's Tuesdays with Dorie recipe featured an easy, unique recipe for potato bread. My husband's ears immediately perked up when he heard that potato bread was on the baking agenda. He loves the soft, moist, slightly-off-yellow loaves of potato sandwich bread you can buy at the store. He claims they make the best grilled cheese sandwiches. However, I quickly informed him that I was fairly certain this recipe would produce a loaf unlike the potato bread he is used to. These loaves have a chewy interior and crusty exterior that is more reminiscent of a good, hearty, rustic Italian loaf.

The dough was a breeze to put together. First, potatoes are quartered and boiled until knife-tender. Then, they are allowed to air dry before being mashed and mixed with flour, olive oil, and yeast. The recipe instructed to boil the potatoes with the skins, but then was rather ambiguous as to whether the skins should be mashed into the dough or not. I chose to remove them because I thought it would be a little off-putting to have chunks of skin randomly scattered throughout the finished loaf.

The dough is kneaded in a stand mixer for about 15 minutes before a scant 20-minute rise period. A quick shaping and the loaves are given one more 20 minute rest before being thrown in the oven to bake. Easy Peasy!


The end result was a full flavored, soft, and slightly salty interior encompassed by a satisfyingly chewy, crackly crust. This is a great bread to enjoy slathered with a bit of butter while still warm. I was super surprised by how developed it looked and tasted given the extremely short rise times. This would be an awesome loaf to make and serve for company when you are especially short on time! It was also a nice, easy recipe to make for my first time back in the kitchen after the birth of my daughter. She spent some quality time with her big brother while I worked on these loaves...


The only criticism I have of the recipe is that it made my kitchen smell a bit like french fries afterwards. I had not really noticed this until my husband came downstairs excitedly and asked: "Are you making fries too?!?!?"

I think he was slightly disappointed to learn that it was still just the bread he was smelling. He consoled himself by eating half a loaf for lunch.

If you would like to give this fantastic recipe a try, please head on over to Simply Sweet where Dawn has posted the recipe in its entirety.

Tuesday, March 19, 2013

TWD: Mocha Chip Cookies


This week's Tuesdays with Dorie challenge features a much easier recipe than the croissant making-fiasco that was our last posting. This time around, the group chose to make Mocha Chip Cookies from Rick Katz.

A variation on your basic chocolate chip cookie, these babies were amped up a bit thanks to the addition of instant coffee. I did not have any instant coffee on hand, so I chose to substitute instant espresso powder, but cut it down by half since espresso powder is much, much stronger. I also chose to use both dark chocolate and white chocolate chunks in the cookies. I thought the dried apricots sounded a little weird so I ended up omitting them. My husband, after trying a cookie straight out of the oven, commented that he thought the apricots would have been an awesome addition. I have no idea what he's talking about - I am so happy I omitted them because I was all about the chocolate-and-coffee combination in this recipe. I did not want any potentially healthy ingredients to get in the way of that divine pairing!


These were absolutely delicious and a recipe that I will definitely be making again in the future. I chose to freeze half the batch and share the other half with some of our friends to prevent us from eating them all in one sitting. However, freezing the cookies did not really deter us from eating them. They taste pretty good frozen and (I am a little ashamed to admit) are now completely gone. Matthew did not care for them too much, which is surprising since he is such a coffee fiend, but Paul and I really did not mind having more to ourselves!

If you would like the recipe, please head over to Peggy's blog Galettista or purchase the book!

Tuesday, March 5, 2013

TWD: Miniature Croissants


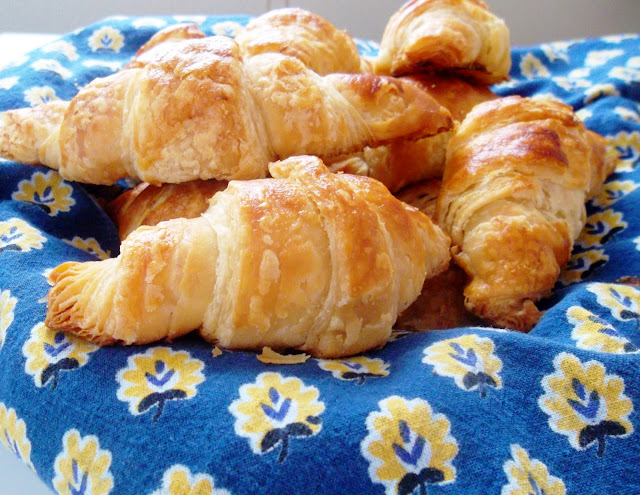
I am going to preface this post by declaring that the recipe for this week's Tuesdays with Dorie was a royal pain in the butt. I simply hated this recipe from the get-go and I think my bad attitude completely spoiled the process of making croissants for the first time. As much as I was looking forward to flexing my baking skills by making these babies, I chose to start them at a time where I was emotionally and mentally in a bit of a frazzled state.

You see, I am getting very nervous about the upcoming labor and delivery of our new baby. In addition to the natural stress that accompanies having to face giving birth again, I am also in the midst of organizing, cleaning, and prepping for welcoming our newborn baby girl. The day I intended to start the croissant dough was a day that I had decided to completely dedicate to home projects. I had planned on starting the dough, hauling up the bins of baby clothes from the basement, and then sifting and organizing through Matthew's old sleepers and outfits to try to find the ones that were gender neutral (among other chores and activities).


So, I started the dough the night before and that did not take much time and was relatively easy. The next day, I went to get the clothes up from the basement before turning the dough for the first time. After rummaging through the boxes for a decent amount of time, I realized that our baby girl has approximately four outfits that are devoid of dinosaurs, choo-choo trains, frogs, and bold lettering proclaiming "Mommy's Handsome Guy." And they are all lime green in color.

Thus, I began to stress. I do not have any clothes for my daughter - what a horrible Mother I am! I made lists and plans to shop for last minute baby items, all the while making note of how much time I had based on when the dang croissant dough had to be rolled out again. The following day became a never-ending dance of running back and forth between various stores and the house as I continued with my last minute baby preparations. Then I realized that I had timed myself horribly with the croissants and would not be baking them until 10:00 pm. And I was ready to collapse by 5:00 pm.

I hated those croissants before I even had the chance to try them.


On top of that, rolling them out proved to be quite difficult for me. My arms for some reason had something against me, because I had a rough time getting them to work hard enough to get that dough as thin as it needed to be. I dreaded every turn of the dough because I knew it would be another unwanted workout for my upper body (and I was remarkably sore the next day!). Like I said, I had a bad attitude.

I ended up cutting the croissants way smaller than they needed to be as well, which resulted in about 40 mini-croissants instead of the 22 larger croissants the recipe was supposed to yield. I had issues with my dough tearing a bit as a stretched it, which was also majorly annoying. My dough also did not appear to rise very well once shaped, although it did become spongy in appearance as indicated in the recipe. Once they were baked, it was 10:45 at night and I was just too beat to wait for them to cool down so I could give them a taste. So I let them sit out overnight on the cooling rack. Matthew was the first one up in the morning, and he waddled downstairs and promptly helped himself to a couple of them. He seemed to enjoy them. He even tried feeding one to the cat. That was a no-go.


As for Paul and I? We were not wowed by them in the least. To me, they just tasted like biting into a stick of butter. I was kind of hoping for something with a little bit more complexity in flavor, but the only flavor I got was butter. Paul agreed...and he really, really likes butter. For such a long, irritating recipe, the results were simply underwhelming.

Thanks to our host Amanda for typing up this recipe in its entirety and posting it on her blog!

Tuesday, February 19, 2013

TWD: Boca Negra


This week's Tuesdays with Dorie recipe featured a perfect dessert for Valentine's Day: an incredibly rich, decadent, chocolate cake that is reminiscent of fudge. This cake is nearly flour-less (containing a scant 1 1/2 tablespoons of flour in the batter) and is given a flavor boost from the addition of bourbon. Booze and chocolate are a fantastic combination.

The best part about this recipe? It was the easiest cake I have ever made in my life. Paul and I stayed in for Valentine's Day (we were kind of forced to since Mr. Matthew had a stomach bug) and made a simple dinner of curried mussels. Paul handled the mussels while I worked on getting this cake into the oven so we could enjoy a slice for dessert. Mussels normally take less than 15 minutes to make, start to finish, and I had this cake sliding into the oven at the exact same time that Paul took the pot of mussels off the stove-top  The batter is simply given a couple of good pulses in the food processor and then dumped into a greased, parchment lined cake pan and baked for 30 minutes.  Voila! Warm from the oven, the cake develops a crackly, brownie-like crust that, once broken into, reveals a chocolaty interior akin to the molten center of a lava cake. I actually enjoyed the cake best after a 24-hour chill in the fridge, after which time it took on the texture of an excellent, perfectly smooth fudge. So delicious.


The recipe calls for the cake to be served with a white chocolate cream that is simply  made by melting white chocolate in hot cream and then adding a generous dosage of more bourbon before heading to the fridge for a 24 hour rest. Paul and I made the cream and ended up whipping it slightly since we did not care for the texture of the cream right out of the refrigerator. However, the flavor really did complement the cake beautifully although honestly the cake was decadent enough without the extra garnish. Next time, I would probably just eat the cake with a scoop of vanilla ice cream to cut the richness a bit. Or some plain whipped cream and fresh raspberries.


Overall, I really enjoyed this recipe for its ease and simplicity. It would make an excellent, no-fuss dessert to impress some dinner guests. If you would like to give the recipe a try, head over to Cathy's Blog.

Tuesday, February 5, 2013

TWD: Focaccia Pizza with Tomato-Basil Topping


This week's Tuesdays with Dorie recipe challenge was for Focaccia, a traditional flat Italian bread normally topped with a generous serving of olive oil, fresh herbs, and coarse salt. However, the uses for a fresh loaf of focaccia are endless - split a slice in half and fill it with your favorite sandwich ingredients, top it with a generous amount of cheese before baking to make an irresistible appetizer, or make a sweet focaccia topped with grapes, blueberries, or blackberries and some coarse lemon sugar.

I chose to try to turn this project into a meal for my family by making a focaccia pizza. My husband and son are pizza fiends and since we are once again giving up cheese during the fast-approaching Lenten season, I figured it would probably be kind to make them as many cheese filled, topped, stuffed, or sprinkled items as I can before the fasting begins.


I have made focaccia many, many times before and this dough was much more stiff than any recipe I have tried previously (the dough is practically pour-able in most other recipes). It really did remind me of more of a pizza dough than a focaccia. However, after a lot of hand kneading and a couple rises, the dough really did form a lot of the bubbles characteristic of a focaccia. The dough was pleasant to work with, not too sticky, and rose beautifully both inside and out of the fridge.

After a 24-hour rest in the fridge, I carefully spread the dough onto a baking sheet sprinkled with semolina and topped it with a quick tomato-basil topping along with some fresh mozzarella and Parmesan cheese. The bread/pizza monstrosity baked up beautifully in the oven and the aroma that filled the kitchen had my husband coming in from the study to check on the progress of the meal every few minutes (as I have mentioned before, he gets rather restless around feeding time).


The end result? It was delicious! It rose up pretty nicely for the most part. The edge pieces were rather thin, but that was probably my fault with stretching the dough too thin in those areas. However, this made a very tasty sheet pizza. My hubby and son devoured 3/4 of it in less than 20 minutes and were singing my praises. We'll see what they have to say about my cooking when they are eating nothing but lentil soup and quinoa salads during Lent.

I've included the recipe for the pizza topping below just in case anyone would like to try making it. It really does make a fabulous topping for pizza.

If you would like to try the focaccia recipe, head over to Sharmini's Blog.

Quick Tomato-Basil Pizza Topping
adapted from Cook's Country


1 (28-ounce) can diced tomatoes
1 tablespoon olive oil
2 garlic cloves, minced
1 teaspoon dried oregano
1/4 teaspoon red pepper flakes
1/4 teaspoon table salt
8 ounces mozzarella cheese, shredded (roughly 2 cups)
1/4 cup grated Parmesan
1/4 cup basil leaves, chiffonade
Sea Salt for Sprinkling


Place tomatoes in a colander, and drain REALLY well.  In a medium bowl, combine drained tomatoes, oil, garlic, oregano, and salt and set aside. In a second bowl, combine mozzarella and Parmesan. Set aside. Sprinkle cheese mixture over the dough, leaving 1/2-inch border on all sides. Top with tomato mixture, and drizzle with olive oil and sea salt. Bake until well browned and bubbling. Slide pizza onto a wire rack, sprinkle with basil, and let cool for 5 minutes. Serve.

Tuesday, December 18, 2012

TWD: Finnish Pulla


Today, I present to you one of my favorite loaves of bread of all time.  Long before I joined the TWD group, I made this bread as a newly married and completely inexperienced baker.  It was one of the first yeast breads I ever made and I was drawn to it simply because it contained a spice with which I had recently become completely enamored: cardamom!


The first time I made this bread, I decided to majorly "up" the cardamom in the original recipe.  Instead of the teaspoon called for, I dumped in a couple heaping tablespoons.  I was not exaggerating when I said I loved the stuff...and I wanted this bread to sing the praises of everything cardamom.  When I proudly presented a thick slice to my husband that night, he nearly gagged on the amount of spice in the bread.  I dismissed his criticism as the ignorant words of a uncultured cardamom-hater.  Then I took a bite.  As much as I love cardamom, even I had to admit that it was a bit overwhelming.  I learned my lesson and have only used the recommended amount ever since.  And it is perfect.


This recipe is as easy and simple as can be.  The dough rises beautifully, braids perfectly, and fills your house with a wonderful, exotic aroma.  The finished bread has a beautiful crumb that is light, soft, and tender.  It's subtle sweetness and gentle spiciness make it delicious enough to be eaten alone.  However, a healthy dose of salted butter wouldn't be a bad addition.


This is a recipe that every lover of carbohydrates should make!  You won't be disappointed!

To find the recipe, please visit the blog belonging to Erin, our host for this week, or use my slightly adapted version is written below.  Or you can just buy the book Baking with Julia for yourself.  Every recipe has been pretty fantastic - the book will make a great addition to any cookbook library and a great last-minute Christmas gift for the baker in your life!

Finnish Pulla
adapted from Baking with Julia

1 cup milk, scalded
1 tablespoon active dry yeast
1/4 cup warm water
1/2 cup sugar
1 teaspoon crushed cardamom (or just use powdered)
1 teaspoon salt
2 eggs, beaten
4 1/2 - 5 cups flour
1 stick butter, melted
Egg Wash (1 egg + 1 tablespoon milk beaten together)
sliced almonds and coarse sugar (for the topping)

Put the milk in a small saucepan and scald it (heat it until a ring of small bubbles is visible around the sides of the pan). Remove the pan from the heat and cool the milk to a room temperature of between 105-115 degrees.

In a large bowl, whisk the yeast into the warm water. Set aside for 5 minutes, or until the yeast has dissolved and is creamy. Whisk in the milk, sugar, cardamom, salt and eggs. Switch to a wooden spoon, add 2 cups of flour, and beat the mixture until smooth. Beat in the butter and add flour, 1/2 cup at a time, until the dough is stiff but not dry.

Cover the bowl with plastic wrap and allow the dough to rest for 15 minutes.

Turn the dough out onto a lightly floured work surface and knead until it is smooth and satiny, about 10 minutes.

Shape the dough into a ball. Place it in a lightly greased bowl, turn it around in the bowl to grease the top, and cover the bowl tightly with plastic wrap. Let the dough rise at room temperature until it doubles in bulk, 45 minutes to 1 hour.

Line a large baking sheet with parchment paper and set aside.

Turn the dough out onto the oiled surface and knead it lightly and briefly, just to deflate it and release the air. Divide the dough into thirds and roll each third into a rope of about 36 inches long. Braid the three strands, braiding as far down to the bottom of the strands as you can. lift the long braid onto the parchment-lined pan, shaping it into a circle as you place it on the pan. Fuse the ends together.

Cover the wreath with a kitchen towel and allow it to rise at room temperature until it is puffy but not doubled, about 45 minutes.

Center a rack in the oven and preheat the oven to 375 degrees.

Brush the egg glaze over the bread. Sprinkle the wreath with coarse sugar and sliced almonds (I skipped the almonds but absolutely insist that the coarse sugar be used!).

Bake for 20 to 25 minutes, until golden, taking care not to over bake the wreath. Transfer the loaf to a rack to cool at room temperature before cutting.

Tuesday, December 4, 2012

TWD: Gingerbread Baby Cakes


This week's Tuesdays with Dorie challenge featured a recipe for a spicy, robust gingerbread cake batter that is baked into tiny baby cakes.  I did not have the specified pan, so I just used a couple 1-cup ramekins to make small, thick cakes.  The recipe was a breeze to put together and featured a lot of ingredients that I normally do not add to my gingerbread batter, including chopped fresh ginger (in addition to ground) and a hefty dose of black pepper.  I loved the fact that the batter also had a fair amount of espresso powder to amp up the cocoa notes in the final cake.

Since I used a different pan then recommended  my cakes ended up baking for around 45 minutes before the tops were spongy enough to spring back when lightly touched.  I tested a little corner of the baby cake I chose to photograph (I could not resist and totally cut into it before prepping it for the photo shoot).  The cakes are wonderfully spicy with just the perfect amount of sweetness.  I honestly love the black pepper in the recipe - it really helps amp up the kick from the ginger!  For the pictures, I chose to make a quick glaze to pour over the top of a sample cake, partially to contrast the dark color but really just to cover up the spot where I bit into the cake. However, I definitely plan on serving these tonight with some cinnamon ice cream.  I can't wait for the hubby to try these since he's a fan of all things gingerbread.


If you would like to give this cake a whirl for one of your Christmas gatherings, please head over to Karen's Blog.  She is our host for this week and has the complete recipe posted!

Tuesday, November 20, 2012

TWD: Best-Ever Brownies


This week's Tuesdays with Dorie featured a recipe for the best ever brownies.  It is also my FIRST time hosting for the group and I could not have been more excited to be trying a new brownie recipe!  In my opinion, this recipe had a lot to live up to.  A couple years ago, I went on a brownie baking spree where I tried to find the recipe that would become my go-to brownie recipe.  I tried every single brownie recipe from every single cooking magazine or cookbook I owned.  My results declared the fudgy, delicious, completely sinful brownies from the Baked cookbook to be the standard by which all other brownies would be judged.

Until this recipe came along.


My husband and I belong to the group of brownie-lovers who believe that the more dense, fudgy, close-to-being-raw brownies are the best.  Granted, we would never turn an opportunity to gobble down a cakey brownie...but our hearts truly lie with the super gooey variety.

These brownies did not disappoint in that department.  They were gooey to the point of being raw, but that is exactly what made them so sensationally irrisistible.  The secret lies in how the eggs are treated.  Half are incorporated immediately into the warm brownie batter while the rest are whipped until they are pale and light.  These are then folded gently into the batter immediately before transferring the brownies to the oven to bake.  My knife came out clean at 28 minutes baking and I let the brownies rest overnight before cutting into them the next afternoon.  I was a little shocked by how creamy they appeared and expressed my concerns to my husband, but he was too busy polishing off his third brownie to listen or care.  According to him, these are "the best brownies in the world."


Paul took the rest of the batch into work with him and returned home with an empty plate and no less than 10 requests for the recipe.  I'm telling you, these are good brownies.

My heart might still be with the Baked brownie, but I would make these again in a heartbeat.  I especially loved the suggestion in the cookbook about using them as a mix-in for homemade ice cream.  We will definitely be trying that next summer!


Best-Ever Brownies
from Baking with Julia

1 1/4 cups sifted all-purpose flour
1 teaspoon salt
2 sticks (8 ounces) unsalted butter
4 ounces unsweetened chocolate, coarsely chopped
2 ounces bittersweet chocolate, coarsely chopped
2 cups sugar
1 teaspoon pure vanilla extract
4 large eggs

Center a rack in the oven and preheat the oven to 350 degrees.

Sift the flour and salt together and set aside.

Melt the butter and chocolate together in a medium saucepan over low heat, stirring frequently and keeping a watchful eye on the pot to make certain the chocolate does not scorch.  Add 1 cup of the sugar to the mixture and stir for half a minute, then remove the pan from the heat and stir in the vanilla.  Pour the mixture into a large bowl.

Put the remaining 1 cup sugar and the eggs into the bowl of a mixer and whisk by hand just to combine.  LIttle by little, pour half the sugar and eggs into the chocolate mixture, stirring gently but constantly with a rubber spatula so that the eggs don't set from the heat.  Fit the whisk attachment to the mixer and whip the remaining sugar and eggs until they are pale, thick, and doubled in volume, about 3 minutes.  Using the rubber spatula, delicately fold the whipped eggs into the chocolate mixture.  When the eggs are almost completely incorporated, gently fold in the dry ingredients.

Pour and scrape the batter into an unbuttered 9-inch square glass or ceramic pan.  Bake the brownies for 25-28 minutes, during which time they will rise a little and the top will turn dark and dry.  Cut into the center at about the 23-minutews mark to see how they are progressing.  They will be perfect if they are just barely set and still gooey.  Cool the brownies in the pan on a rack.  Cut into bars and serve.

The brownies will keep, covered, for 2-3 days at room temperature and can be frozen for up to a month!

Tuesday, November 6, 2012

TWD: Buttermilk Crumb Muffins


This week's Tuesdays with Dorie featured a simply delightful morning pastry from Marion Cunningham.  These buttermilk crumb muffins were a cinch to put together and, although unassuming and unpretentious in appearance, were undeniably delicious.  Sometimes the simplest ingredients, once stirred together in a certain fashion and combined with other, equally humble pantry staples, can produce a truly memorable treat.

After attending Mass early Sunday morning, my husband and I whipped these together in a jiffy.  We decided to add blueberries to half the batter and made 12 regular size muffins and 2 jumbo muffins.  Instead of shortening (I never have that stuff in the house), I chose to use butter.  The most tedious part about the whole recipe was rubbing the butter into the batter.  Since my butter had been chilled, it took quite a while for the warmth from my fingers to soften the butter enough to properly rub it into the flour/sugar mixture.  And by "quite a while," I mean about 5 minutes.  But, it seemed like forever.  I am usually impatiently hungry on Sunday mornings.


Little man ate two of these the second they emerged from the oven.  In total silence, he ate them with a fork (one of his quirks...heaven forbid his little hands should get dirty!) straight out of the wrapper.  With his cheeks still stuffed full with the remnants of his muffin, he held his plate up and, with a muffled voice, asked: "More...cake?"


I loved these muffins.  I cannot decide whether I prefer the plain muffins or the blueberry version.  They were both delightful. Paul's teeth were blue by the end of breakfast, so I don't think there is any doubt as to which version he liked best!

This was a great recipe and one we will definitely be making again. Next time, I might just dump the whole batter into a cake pan and make it coffee cake style.  Maybe this weekend...

If you would like to give these muffins a try (and I really think you should!), head on over to Alisa's Blog.  She was our host for this week!